Monday, 21 March 2016

Open Time picker on EditText Click In android

activity_nitin.xml

<EditText   
 android:id="@+id/edtSelectTimeAA" 
   android:layout_width="fill_parent" 
   android:layout_height="40dp" 
   android:width="150dp"   
 android:background="@drawable/rounded_edittext"
    android:ems="10"  
  android:hint="   Select Time"  
  android:inputType="time" />


Nitin.java


import android.app.Dialog;
import android.app.TimePickerDialog;
public class.....
EditText edtSelectTime;

public String time;

private int  mHour, mMinute;

static final int TIME_DIALOG_ID = 1;

public int hour, minute;
@Overrideprotected void onCreate(Bundle savedInstanceState) {

edtSelectTime = (EditText) findViewById(R.id.edtSelectTimeAA);
// Assign current Date and Time Values to Variables


Calendar c = Calendar.getInstance();

mHour = c.get(Calendar.HOUR_OF_DAY);
mMinute = c.get(Calendar.MINUTE);
//----------------------------------------------------------
----------------------------------------

        edtSelectTime.setOnFocusChangeListener(new
 View.OnFocusChangeListener() {

            @Override            public void onFocusChange(
View v, boolean hasFocus) {
                // TODO Auto-generated method stub       
         if (hasFocus) {
                    showDialog(TIME_DIALOG_ID);
                    bool = true;
                }

            }
        });

        edtSelectTime.setOnClickListener(new View.OnClickListener()
 {
            @Override            public void onClick(View v) {
                // Show the TimePickerDialog            

    showDialog(TIME_DIALOG_ID);
            }
        });

    } // end of onCreate method()
    //------------------------------------------------------
--------------------------------------------


//----------------------------------------------------
----------------------------------------------

protected Dialog onCreateDialog(int id) {
    switch (id) {
       
        case TIME_DIALOG_ID:
            return new TimePickerDialog(this,
                    mTimeSetListener, mHour, mMinute, false);
    }//end of switch    return null;
}// end of method onCreateDialog
//-------------------------------------------

-------------------------------------------------------


    //------------------------------------------------
--------------------------------------------------  
  // Register  TimePickerDialog listener  

  private TimePickerDialog.OnTimeSetListener mTimeSetListener =
            new TimePickerDialog.OnTimeSetListener() {
                // the callback received when the user "sets" 
//the TimePickerDialog in the dialog             
   public void onTimeSet(TimePicker view, 
int hourOfDay, int min) {
                    hour = hourOfDay;
                    minute = min;
                    // Set the Selected Date in Select date Button 

                   edtSelectTime.setText(hour + " : " + minute);

                }
            };

//----------------------------------------
----------------------------------------------------------

}//End of class

Thursday, 4 February 2016

Android Popup window accept , retrieve and save data to SQLite

Android Popup window accept , retrieve and save data to SQLite

1. Create Activity
2. Add 1 Button  


Create This Activity with 1 Button

activity_popup.xml

<?xml version="1.0" encoding="utf-8"?>
<RelativeLayout xmlns:android="http://schemas.android.com/apk/res/android"
xmlns:tools="http://schemas.android.com/tools"
xmlns:app="http://schemas.android.com/apk/res-auto" android:layout_width="match_parent"
android:layout_height="match_parent" android:paddingLeft="@dimen/activity_horizontal_margin"
android:paddingRight="@dimen/activity_horizontal_margin"
android:paddingTop="@dimen/activity_vertical_margin"
android:paddingBottom="@dimen/activity_vertical_margin"
app:layout_behavior="@string/appbar_scrolling_view_behavior"
tools:showIn="@layout/activity_practice" tools:context="com.kulsoft.nitin.kuldiet.Practice">
<Button
android:layout_width="wrap_content"
android:layout_height="wrap_content"
android:text="Show PopUp"
android:id="@+id/btnShowPopup"
android:layout_alignParentTop="true"
android:layout_centerHorizontal="true"
android:layout_marginTop="124dp" />
<TextView
android:layout_width="wrap_content"
android:layout_height="wrap_content"
android:textAppearance="?android:attr/textAppearanceLarge"
android:text="Show pop up window"
android:id="@+id/textView2"
android:layout_marginTop="36dp"
android:layout_alignParentTop="true"
android:layout_centerHorizontal="true" />
<TextView
android:layout_width="wrap_content"
android:layout_height="wrap_content"
android:textAppearance="?android:attr/textAppearanceLarge"
android:text="Nitin Tekale"
android:id="@+id/textView5"
android:layout_below="@+id/btnShowPopup"
android:layout_alignLeft="@+id/btnShowPopup"
android:layout_alignStart="@+id/btnShowPopup"
android:layout_marginTop="160dp" />
</RelativeLayout>


Create this XML file in layout   Layout/popup.xml


popup.xml

<?xml version="1.0" encoding="utf-8"?><RelativeLayout xmlns:android="http://schemas.android.com/apk/res/android"    android:layout_width="match_parent" android:layout_height="match_parent">
    <TextView        android:layout_width="wrap_content"        android:layout_height="wrap_content"        android:textAppearance="?android:attr/textAppearanceLarge"        android:text="New Diet Plan"        android:id="@+id/textView14"        android:textStyle="bold"        android:layout_marginBottom="42dp"        android:layout_above="@+id/edtTimeANDP"        android:layout_alignLeft="@+id/edtTimeANDP"        android:layout_alignStart="@+id/edtTimeANDP" />

    <EditText        android:layout_width="wrap_content"        android:layout_height="wrap_content"        android:inputType="text"        android:ems="10"        android:id="@+id/edtTimeANDP"        android:hint="Enter the time"        android:layout_above="@+id/edtMenuANDP"        android:layout_alignRight="@+id/btnClearANDP"        android:layout_alignEnd="@+id/btnClearANDP" />

    <EditText        android:layout_width="wrap_content"        android:layout_height="wrap_content"        android:inputType="textMultiLine"        android:ems="10"        android:minLines="3"        android:maxLines="3"        android:id="@+id/edtMenuANDP"        android:hint="Enter the menu details here..."        android:layout_centerVertical="true"        android:layout_alignLeft="@+id/edtRemarkANDP"        android:layout_alignStart="@+id/edtRemarkANDP" />

    <EditText        android:layout_width="wrap_content"        android:layout_height="wrap_content"        android:inputType="textMultiLine"        android:ems="10"        android:minLines="2"        android:maxLines="2"        android:id="@+id/edtRemarkANDP"        android:hint="Remark about the above menu..."        android:layout_marginTop="17dp"        android:layout_below="@+id/edtMenuANDP"        android:layout_centerHorizontal="true" />

    <Button        android:layout_width="wrap_content"        android:layout_height="wrap_content"
        android:text="Clear"        android:id="@+id/btnClearANDP"        android:layout_below="@+id/edtRemarkANDP"        android:layout_alignRight="@+id/edtRemarkANDP"        android:layout_alignEnd="@+id/edtRemarkANDP" />

    <Button        android:layout_width="wrap_content"        android:layout_height="wrap_content"        android:text=" ADD "        android:id="@+id/btnAddANDP"        android:layout_alignBaseline="@+id/btnClearANDP"        android:layout_alignBottom="@+id/btnClearANDP"        android:layout_alignLeft="@+id/edtRemarkANDP"        android:layout_alignStart="@+id/edtRemarkANDP" />

    <requestFocus        android:layout_below="@+id/textView14"        android:layout_alignRight="@+id/textView14"        android:layout_alignEnd="@+id/textView14" />

    <ImageButton        android:layout_width="40dp"        android:layout_height="40dp"        android:id="@+id/btnCancelANDP"        android:scaleType="fitXY"        android:baselineAlignBottom="true"        android:background="@drawable/ic_cancel_black_24dp"        android:layout_alignTop="@+id/textView14"        android:layout_alignRight="@+id/edtTimeANDP"        android:layout_alignEnd="@+id/edtTimeANDP" />
</RelativeLayout>


Popup.java


import android.os.Bundle;
import android.support.v7.app.AppCompatActivity;
import android.support.v7.widget.Toolbar;
import android.view.Gravity;
import android.view.LayoutInflater;
import android.view.View;
import android.widget.AbsListView;
import android.widget.Button;
import android.widget.EditText;
import android.widget.ImageButton;
import android.widget.PopupWindow;
import android.widget.Toast;

//-------------------------------------------------------------------------------------public class Practice extends AppCompatActivity {
    Button btnShowPopup;
    EditText edtTime,edtMenu,edtRemark;
    Button btnAdd,btnClear;
    String time,menu,remark;
    DBConnection con;
//-------------------------------------------------------------------------------------    @Override    protected void onCreate(Bundle savedInstanceState) {
        super.onCreate(savedInstanceState);
        setContentView(R.layout.activity_practice);
        Toolbar toolbar = (Toolbar) findViewById(R.id.toolbar);
        setSupportActionBar(toolbar);
        con =new DBConnection(getBaseContext());
       btnShowPopup =(Button)findViewById(R.id.btnShowPopup);
       btnShowPopup.setOnClickListener(new View.OnClickListener() {
            @Override            public void onClick(View v) {
                showPopup();
            }
        }); // end of btnShowPopup Onclick Listener

    } // End of onCreate Method
//-------------------------------------------------------------------------------
    private void showPopup() {

        LayoutInflater layoutInflater=(LayoutInflater)getBaseContext()
                .getSystemService(LAYOUT_INFLATER_SERVICE);

        final View popupView=layoutInflater.inflate(R.layout.popup,null);

        final PopupWindow popupWindow=new PopupWindow(popupView,AbsListView.LayoutParams.WRAP_CONTENT,
                AbsListView.LayoutParams.MATCH_PARENT,true);

        popupWindow.setTouchable(true);
        popupWindow.setFocusable(true);
        popupWindow.showAtLocation(popupView, Gravity.CENTER,25,150);

        edtTime=(EditText)popupView.findViewById(R.id.edtTimeANDP);
        edtMenu=(EditText)popupView.findViewById(R.id.edtMenuANDP);
        edtRemark=(EditText)popupView.findViewById(R.id.edtRemarkANDP);
//-------------------------------------------------------------------------------------        //Handles Clear button click event//-------------------------------------------------------------------------------------        ((Button)popupView.findViewById(R.id.btnClearANDP))
                .setOnClickListener(new View.OnClickListener() {
                    @Override                    public void onClick(View v) {
                        clearAllFields();
                    }
                });
//-------------------------------------------------------------------------------------        //Handles Add button click event//-------------------------------------------------------------------------------------       btnAdd=(Button)popupView.findViewById(R.id.btnAddANDP);
        btnAdd.setOnClickListener(new View.OnClickListener() {
            @Override            public void onClick(View v) {

                try {
                    time = edtTime.getText().toString();
                    menu = edtMenu.getText().toString();
                    remark = edtRemark.getText().toString();

                    if (edtTime.getText().toString().equalsIgnoreCase("'")) {
                        Toast.makeText(getBaseContext(), "Please enter \n TIME for menu ", Toast.LENGTH_LONG).show();
                        edtTime.requestFocus();
                    } else if (edtMenu.getText().toString().equalsIgnoreCase("'")) {
                        Toast.makeText(getApplicationContext(), "Menu field can \n NOt be blank", Toast.LENGTH_LONG).show();
                        edtMenu.requestFocus();
                    } else if (edtRemark.getText().toString().equalsIgnoreCase("")) {
                        Toast.makeText(getApplicationContext(), "Remark Field \n Can NOt be blank", Toast.LENGTH_SHORT).show();
                        edtRemark.requestFocus();
                    } else {
                        con.insertIntoDietPlans(time, menu, remark);
                        //con.CloseDB();                        Toast.makeText(getApplicationContext(), "Diet Plan Addedd Successfully.", Toast.LENGTH_LONG).show();
                        clearAllFields();
                    }//end of else                }//end of try block                 catch (Exception ex)
                {
                    ex.printStackTrace();
                    Toast.makeText(getApplicationContext(),ex.getMessage().toString() + "\n",Toast.LENGTH_LONG).show();
                }//end of catch            }//end of public void onClick        }); // End of btnAdd.setOnClickLestener//-------------------------------------------------------------------------------------        //Handles Cancel button click event
        ((ImageButton)popupView.findViewById(R.id.btnCancelANDP))
                .setOnClickListener(new View.OnClickListener() {
                    @Override                    public void onClick(View v) {
                        popupWindow.dismiss();
                    }
                });
//-------------------------------------------------------------------------------------
    }//end of showPopup Method//-------------------------------------------------------------------------------------
        private void clearAllFields() {
            edtTime.setText("");
            edtMenu.setText("");
            edtRemark.setText("");
            edtTime.requestFocus();
        }//End of Clear all fields
//-------------------------------------------------------------------------------------
}//End of Class


#Nitin tekale 
ni3tekale143@gmail.com


Monday, 16 November 2015

Fix Java was Started but Returned Exit Code=13 in Eclipse

If you are  getting an  error saying “Java was Started but Returned Exit Code=13” during Eclipse installation,  then here is fix for that. 
Even I faced this problem during eclipse installation on my windows operating system. After searching on google I found that many of the users facing similar issue with Eclipse. 
If you are one of them, then here is the solution for the error.

Reasons  for Java was Started but Returned Exit Code=13 Error:


Before going to the solution, let us know why it is showing that error. If you know the problem behind this issue we can easily fix that error.
Reason 1: The most common reason behind this problem is, we are trying to install different bit version-that is, 64 bit or 32 bit  version of the software. It maybe either Eclipse or Java.
Reason 2: Configuration mistake in Eclipse.ini  file
Reason 3: Special characters ( #, !, @) in Eclipse installation directory
Reason 4: You maybe using latest version of Eclipse, but you might be using  wrong version or unsupported version  of Java Virtual Machine (JVM)
The above are the main reasons causing that Exit code =13 in eclipse. Now let us know how to fix that error.


How to Fix Java was Started but Returned Exit Code=13 Error in Eclipse

Solution for Reason 1:
Check which version of operating system you are running. To check that, open windows explorer by pressing Win+E key on your keyboard.
Now on This PC (My  Computer)  which you found on left side, Select that and right click on mouse. In that pop up menu choose Properties option.  When you click that properties option you will see system properties window. In  that window have a look on “System Type” option.


In that  System type you will see 64-bit Operating System. That’s what we need to know.
Now we know which version of operating system we are running.
After knowing operating system version, make sure you downloaded the 64-bit version of Eclipse as well as 64-bit version of Java software.
If you downloaded 32 bit version (X86) of Java or eclipse any one of them, you will get that Exit code=13 error.
Please double check the versions which you have downloaded. Because during installation it won’t show any error regarding incompact able version. It will install smoothly.
In my case I have installed 32 bit version of Java so I’m getting that error.

Solution for Reason 2:
Maybe you might have made a mistake in configuring Eclipse.ini file, which can be  found on Eclipse directory  itself.  You can check this official guide if needed.
Here the few important rules to be noted while specifying -VM option
  • The -vm option and its value (the path) must be on separate lines.
  • The value must be the full absolute or relative path to the Java executable, not just to the Java home directory.
  • The -vm option must occur before the -vmargs option, since everything after -vmargs is passed directly to the JVM.
You can check the below screenshot of my  working Eclipse.ini configuration.


Solution for Reason 3:
You have might have special characters like #, !, @  in eclipse installation directory. That is, if  your eclipse installation address contains any special characters, then it shows that error. So make sure you don’t have any special characters.
Example:
Before fixing special character
C:\# IDE\eclipse 3.7\
Have you noticed that “#” character?
After fixing that special character in address
C:\IDE\eclipse 3.7\
and that solved the problem.

Reason 4 Solution:
Maybe you are using latest eclipse version and unsupported Java version.
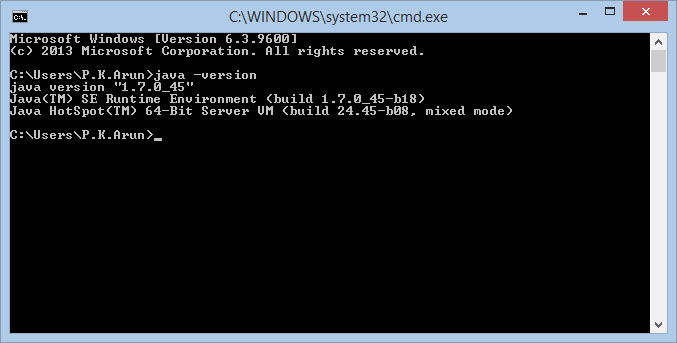
check java version command windows
To check which version of java you are using open command prompt by pressing win+R key and type cmd and press enter. Now in that console type Java -version command to know java version.
Now research whether eclipse support that version or not.
(or)
You can open “readme” folder in Eclipse folder and open readme_eclipse.html to see which version it supports.
(or)
I recommend you to download both Java and eclipse latest version.


Sample Post of Android Blog By Nitin Tekale

I am Android


Why should android??


Applications of Android


Versions of android


Architechture of Android


Architechture of Android


Architechture of Android


Android Development by Nitin Tekale   www.ni3tekaleandroid.blogspot.com

Ni3 Tekale at Blogger